Best Export Settings for Instagram Reels: A Complete Video Editing Tutorial

Are you struggling with blurry, pixelated Instagram Reels that don’t reflect your hard editing work? You’re not alone. Many creators following basic video editing tutorials still face frustrating compression issues that can ruin their carefully crafted content. In this comprehensive guide, we’ll walk you through proven export settings that will help your Reels look crisp and professional every time.
Why Video Quality Matters for Your Instagram Success
Poor video quality can seriously impact your Reels’ performance and growth:
- Lower engagement rates due to viewer drop-off
- Reduced reach and visibility in Instagram’s algorithm
- Diminished visual appeal that hurts your brand
- Less professional appearance compared to competitors
Instagram’s compression algorithm can be harsh on poorly exported videos. However, with the right video editing tutorials and export knowledge, you can work with the platform instead of against it. Studies show that enabling “High quality uploads” in your Instagram settings can significantly improve your video output quality.
Best Export Settings for Instagram Reels
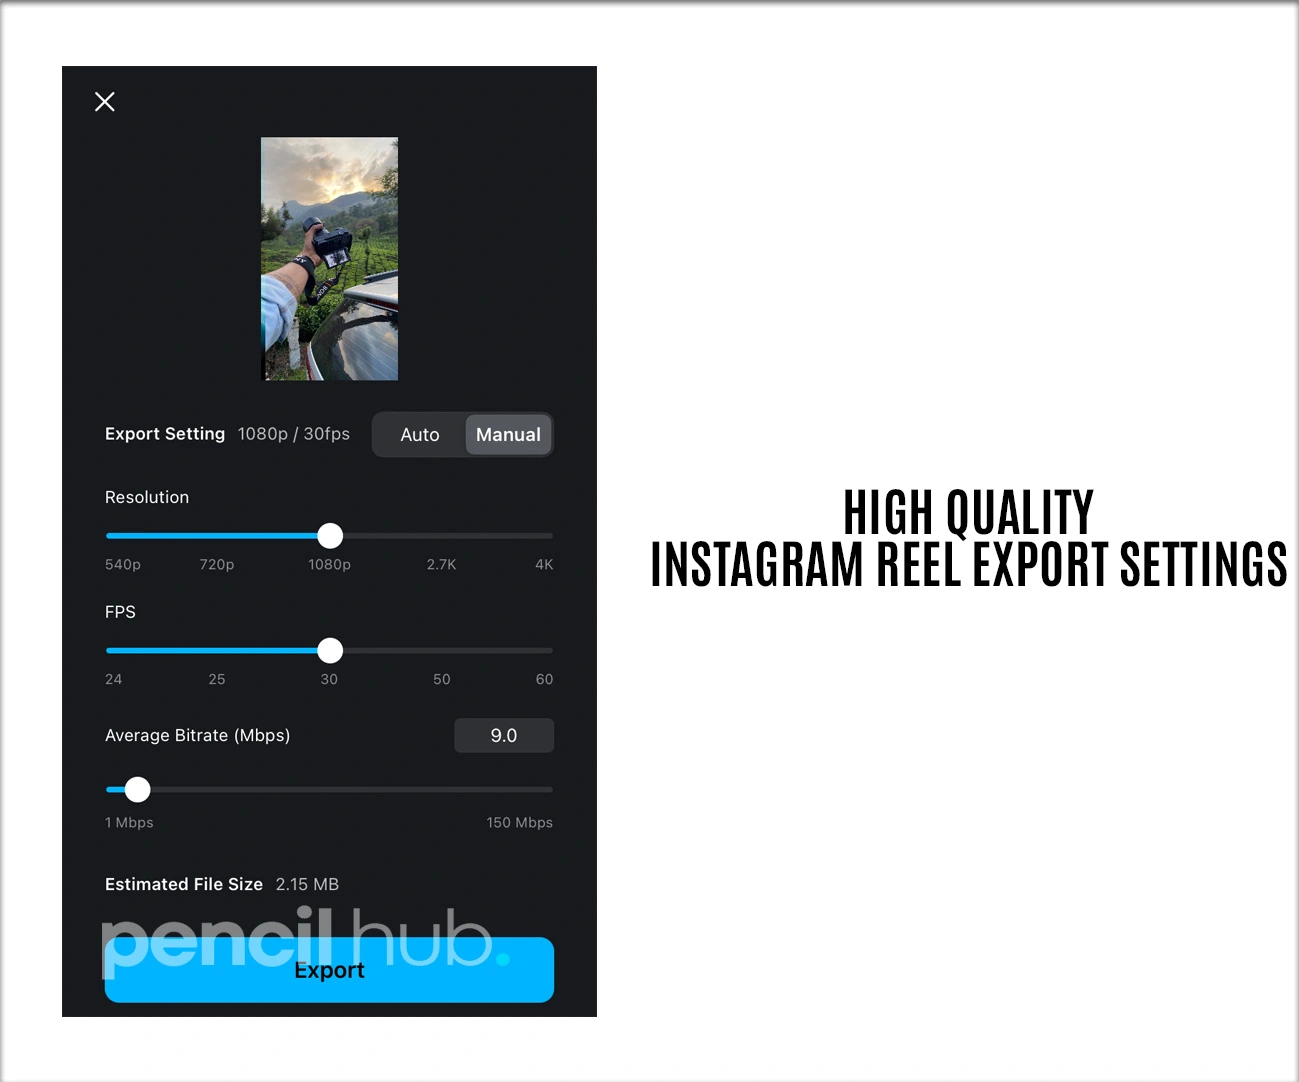
1. Technical Specifications That Actually Work
Video Format: MP4 (H.264 codec)
Resolution: 1080 x 1920 pixels (9:16 aspect ratio)
Frame Rate: 30 fps Bitrate:
Target bitrate of 15-20 Mbps for optimal quality, with maximum bitrate around 24 Mbps Maximum
File Size: Keep under 4GB
Audio: AAC codec, 48kHz sample rate, stereo

Step-by-Step Export Process for Popular Editing Software
PC/Desktop Export Settings
Adobe Premiere Pro Tutorial
Follow these video editing tutorial steps for professional results:
- Go to File > Export > Media
- Select H.264 format from the dropdown
- Set custom dimensions to 1080×1920
- Choose the VBR 2 Pass encoding method
- Set target bitrate: 15-20 Mbps, maximum: 24 Mbps
- Frame rate: 30fps constant
- Enable “Render at Maximum Depth” for better color
- Audio: AAC, 48kHz, 320 kbps
- Export and test the upload quality
After Effects Tutorial for Motion Graphics
When working with motion graphics and effects:
- Create a composition at 1080×1920, 30fps
- Add to Adobe Media Encoder render queue
- Use H.264 preset, modify these settings:
- Bitrate: VBR 2 Pass, 15-20 Mbps target
- Profile: High
- Level: 4.2
- Enable GPU acceleration for faster rendering
- Set field order to “Progressive”
- Preview before final export
DaVinci Resolve (Free Professional Option)
Perfect for creators following video editing tutorials on a budget:
- Go to the Deliver tab at the bottom
- Select the “YouTube” preset as the starting point
- Modify these settings:
- Resolution: Custom 1080×1920
- Frame rate: 30fps
- Codec: H.264
- Quality: Choose “Custom” and set to 15,000 kbps
- Audio codec: AAC, 48kHz
- Click “Add to Render Queue”
- Start render process
Final Cut Pro (Mac Users)
For Mac-based video editing tutorials:
- Select your timeline and go to File > Share > Master File
- Choose these settings:
- Format: Video and Audio
- Video codec: H.264
- Resolution: 1080×1920
- Frame rate: 30fps
- Data rate: 20,000 kbps
- Click “Next” and export
Mobile Editing Apps Export Settings
CapCut (Most Popular Free App)
For design tutorials for beginners using mobile apps:
- Tap “Export” after editing
- Select “4K 60fps” for highest quality
- Choose “Standard” export speed
- Enable “Smart HDR” if available
- Let Instagram handle final compression
- Export time: 2-5 minutes depending on length
VN Video Editor
Professional mobile editing option:
- Tap export icon (up arrow)
- Select “2K” resolution option
- Choose “High” quality setting
- Frame rate: 30fps
- Format: MP4
- Enable “Hardware acceleration” if available
Upload Best Practices for Maximum Quality
Before Uploading
- Use strong WiFi connection
- Clear Instagram app cache
- Enable “High Quality Uploads” in settings
- Upload during off-peak hours for better processing
During Upload Process
- Open Instagram and tap the + icon
- Select “Reel” from the options
- Import your optimized video file
- Add minimal filters (they can degrade quality)
- Write engaging captions with relevant keywords
- Use strategic hashtag combinations
- Preview thoroughly before posting
Advanced Tips for Professional Results
- Test different export settings with short sample clips
- Keep original project files backed up
- Monitor your Reels’ performance using Instagram Analytics
- Study successful creators’ video quality in your niche
- Experiment with different bitrate settings for your content type
For motion-heavy content like dance or sports, higher bitrates perform better. For talking-head content, you can optimize for smaller file sizes.
Conclusion
Mastering Instagram Reels export settings doesn’t have to be complicated when you follow proven video editing tutorials and techniques. By implementing these specific export settings – from the optimal 15-20 Mbps bitrate to the crucial 1080×1920 resolution – you’ll create content that looks professional and engages your audience effectively.
Remember that quality matters, but consistency is equally important. Keep experimenting with these settings until you find what works best for your content style. Whether you’re following premiere pro tutorial guides or after effects tutorial workflows, these export fundamentals will serve as your foundation for success.
For more advanced techniques and platform-specific strategies, check out our comprehensive guide on social media video optimization and our collection of editing workflow templates.